Introduction
Cluster is the functionality that allows multiple Prisms to communicate with each other when connected to the same system.
This functionality is critical for:
- Load balancing
- when connected to the same system, the Prisms must communicate with each other in order to share the available power
- without Cluster multiple Prisms on the same system CANNOT have load balancing enabled.
- HoReCa Management
- in case of RFID card recharge authorization with the HoReCa service, the Prisms can share the list of cards authorized for recharge. Therefore, it is not necessary to activate the cards on each Prism, but they will be activated for all Prisms in the Cluster.
If your Prisms have a lower version, connect them to the Internet and perform an upgrade (follow the Prism installation manual)
Design of a Prism Cluster
When designing a Cluster, it is necessary to take into consideration the size of the plant on which the Cluster will be installed.
For Clusters up to 5 Prism the Smart Meter supplied with Prism is adequate as it can measure currents up to 100A.
For Clusters of up to 30 Prisms, you should request 1000A TA sensors, which are available for purchase in the online shop as an additional accessory.
Refer to the Installation and User Guide.
For Clusters over 30 Prisms contact Silla support to schedule Cluster installation and configuration.
Installation
For installation of the Cluster Prisms, follow all directions in the Prism Installation Manual.
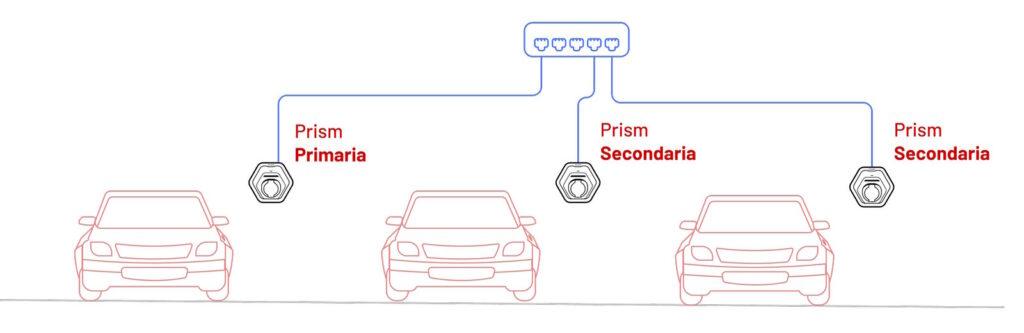
Only one of the Prisms, which we will call “Primary Prism,” will have the sensor for load balancing connected. All other Prisms will not have the sensor connected and we will call them “Secondary Prisms. “

In order to connect the Prisms together to create a Cluster, all Solar Prisms must be connected to the same local area network via Ethernet cable.
Configuration
The configuration of a Cluster occurs with these steps:
- Connection to the Prisms.
- Primary Prism Configuration.
- Secondary Prism Configuration.
- Cluster Configuration.
Materials Needed:
- PC (laptop or fixed) connected to the same network as the Prisms.
- Installation manual for each Prism.
- Need login credentials in the label under “Product Identification.”
Connection to Prisms
For a Cluster to function properly, it is necessary:
- Connect all Prisms to the same local area network.
- Open TCP ports 5555 and 5698.
- Set static IP addresses for all Prisms.
Before proceeding, it is necessary to identify the IP addresses of all Prisms connected to the local network.
Prisms are identifiable by their MAC address, which is of the type 78:D4:F1:11:XX:XX (*). The MAC address can be found on the credentials label in the Installation Manual of each Prism.
Once you have obtained all the Prism IP addresses you can proceed with the configuration, making sure you have them in range:
- IP addresses and serial numbers of each Prism.
- Installation Manual for each Prism, where there is alabel with the credentials to access the Prisms.
Primary Prism Configuration
Once the network is set up, you can proceed with the configuration of Prism:
- Go to the Primary Prism Guided Configuration page <IP_Primary> /welcome and login with the “installer” credentials listed on the label.
- Select “Primary Prism (Cluster).”
- Save IP Address and PIN.
Secondary Prism Configuration
- Go to the Secondary Prism Configuration Wizard page <IP_Secondary> /welcome and login with the “installer” credentials listed on the label.
- Select “Secondary Prism (Cluster).”
- Enter the IP address and PIN code of the Primary Prism.
- Verify that the connection test is successful and click “Go to dashboard” to complete the configuration.
Primary Prism Configuration Completion
- Reopen the Primary Prism configuration wizard page.
- Click on the“Start Discovery” button.
- Verify that all Secondary Prisms are in place.
- Remove any Prisms that you do NOT want to include in the Cluster.
- Click on“Finish Discovery.”
- Click on the“Go to Dashboard” button to finish the configuration.
- Now that the configuration is complete the Cluster is ready for use! Follow the “Using” chapter for more details.
Use
Load balancing
Load balancing, which must be enabled by the Primary Prism, allows all Prisms in the Cluster not to exceed the maximum power of the system.
Set the maximum power
Setting the maximum power should be done through the Guided Primary Prism Configuration.
How load balancing works
Load balancing adjusts the power of each Prism to avoid exceeding the maximum power. In particular, Prism will try to:
- Load as many cars as possible.
- Power is divided equally among all cars.
- Prioritize first-come, first-served.
- In case there is not enough power to charge all connected cars, the charging of the one who connected the car last will be paused.
- Charging will resume as soon as sufficient power is available.
- 1.4 kW in single phase
- 4 kW in three-phase
RFID Authorization
In case you want to authorize recharging through RFID cards, to allow recharging only to authorized users, follow the HoReCa Guide.
Charging mode
In case of Cluster, the charging mode will be modifiable only by the Primary Prism and will be the same for the whole Cluster.
Normal Mode
In Normal mode, the Prisms will use all the power they need, always staying below the maximum power of the meter.
Solar mode
In Solar mode, the Prisms will use only the excess power from the PV system that would be sold to the grid.
Error handling
- What happens in case of errors of the Primary Prism sensor?
- In case the sensor has problems reading, all Prisms will lower the charging current to the minimum, that is, 6A.
- What happens if a Secondary Prism has communication problems with the Primary?
- In this case, the Secondary Prism will automatically set the charging current to the minimum, that is, 6A.
- 1.4 kW in single phase
- 4 kW in three-phase